- Have you ever wondered “how did the natives make such beautiful and soft leather without all the chemicals?” We will attempt to explain the process so you can try it at home. We are assuming that you already posses the animals skin.
1. Fleshing- with a rib bone, leg bone or hardwood stick that has been carved and burnished, push all the flesh off of the hide. you need a smooth beam (log). You can either lean it against a tree pinning the hide with the beam or lay it across the log pinning it with your body.
2. Dehair– this can be done on or off the rack.
- Off the rack – Soak the hide in a stream till the hair starts to slip on the neck then use the same technique as fleshing.
-
- On the rack- Poke holes every 4 inches around the edge of the hide. Make sure the holes are 1/2 inch in from the edge running parallel to the edge about 1/2 in length. Stretch the hide tight enough using string through the holes and pulling the hide evenly so that is can dry out on the rack without any wrinkles.
-
- once dry use a bone or stone scraper to remove the hair. which leads into the next step
3. Scrape or remove the grain – when the hair is gone you will see a peppery look to the hide. This is hair follicles embedded in the epidermis (outer) layer of the skin. This layer must be removed.
Scrape carefully till the dermis layer is exposed. The skill will become fluffy like suede. It is best to work in small sections or blocks 4 to 6 inches square.
On your first hide you will probably scrape so lightly that this will take hours or scrape so hard that you poke holes through it. Either way, don’t give up, it’s all part of the learning process. you can always tan another hide, right.
Be careful along the belly and inner thigh areas. They tend to be the thinnest and easiest to bust through.
4. Membrane- once the dermis layer is reached turn the hide over and scrape the flesh side till it is fluffy as well. This side doesn’t take as much scraping. In both steps 3 and 4 work the center of the hide first and then do the edges. I like to keep a two-inch buffer around holes and the edges, then come back and scrape those areas last.
5. Brain- take the animal brain(if you have it) and smash it up in warm water. about 1/2 gallon to 1 gallon is all you need. If you don’t have any brains you can substitute with egg yolks (not the whites). DON’T USE HOT WATER.
Soak your hide in the solution either by taking the hide off the rack and placing it in a container with the solution or use something to apply the solution saturating the hide while it is racked.

6. Softening- once the hide is saturated and let sit overnight without drying out, you can begin to soften the hide. the fibers in the dermis layer must be kept moving until the hide is completely dry. Do this by re racking the hide ( if not still on the rack) and using a stick with a rounded smooth end.
Take the smooth end of the stick and push on the hide while sliding the stick across the surface of the hide. When the hide is no longer cool to the touch then it should be dry. You can soften off the rack as well but it doesn’t turn out as flat and smooth as one softened on a rack.
You should have a milky white soft and fluffy skin in your hands. be careful not to get it wet or it will turn back into rawhide.
7. Smoking- First make the hides into a bag by either sewing or gluing the edges together, Leave an opening about 6 inches around in the neck area. While sewing or gluing the bag together, have a hardwood fire lit and burning.
Dig a hole about 6 -8 inches across and 1 foot deep. Hang the hide bag upside down over the hole. Connect a skirt made of cloth or other hides to the neck.
Add hot coals only, no burning sticks to the hole. Break up the punky wood and cover the coals
Stake or use rocks to hold the skirt down around the hole to funnel smoke into the bag. Make sure that the punky wood does not flame up. Add punky wood as needed to keep a heavy smoke generated.
Once the outside of the bags starts to change color (about 1 hour) turn the hide inside out and repeat. The longer you smoke the hide on each side the darker the color will be. 2 hours on each side turns out a nice dark color.
Once the second side is complete you can wash the hide and let it dry and you will have a beautiful piece of buckskin. This process can be completed in just a couple of days.
We hope this post was helpful. If you are a beginner seeking hands-on experience in hide tanning or other skills, please check out our Adult Workshops
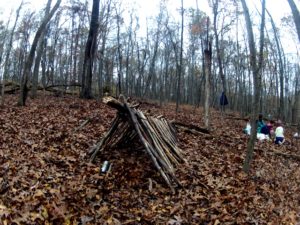 Volumes could be written about different styles of shelter, materials, etc. One of the most basic and frequently taught methods is a simple debris hut, which is essentially a framework of branches that can be covered and filled with layers of debris that shingle (on the outside) and insulate (on the inside). There are dozens of ways to tweak and customize this type of shelter, and it’s the type of shelter we teach most often. So for kids, what are some of the benefits to learning how to build shelter?
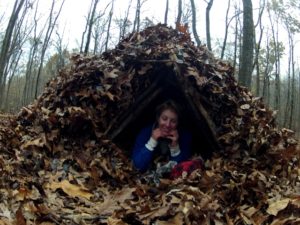 For one thing, it’s a skill that allows a wide range of ages and skill levels to tap into their powers of creativity and imagination. There’s a reason almost all kids love to build forts, and they’re all the better for doing it outside in the fresh air and sunshine instead of indoors where their poor little developing brains are bathing in the ambient noise of television commercials and the harmful compounds off-gassing from paints, carpet, and couch cushions. Building a shelter requires cognitive skills like visualizing, executing plans, problem-solving, and overcoming setbacks. Debris huts are relatively free-form, too. The sky is the limit in terms of finding new ways to fit the pieces together, find new ways to utilize the materials you actually have at hand in different situations, or add features like a lowered entryway that will keep your warm body heat trapped in the inner chamber, a fence of sticks at the base of your walls to trap slumping layers of leaves, or a lean-to/heat shield outside to protect a fire if you have one. The building blocks for shelter are accessible to almost everyone, with little skill or modification necessary. Sticks, leaves, and bark are laying everywhere at your feet, just waiting for kids to imagine and create things out of them, and shelter really helps people of all ages re-establish a creative connection to their environment.
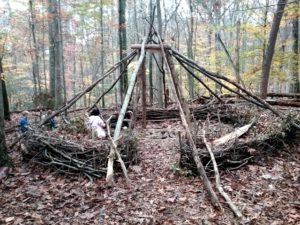 Building shelter can also be a real ice-breaker for students who aren’t as comfortable in natural settings. Some kids are even squeamish about simply sitting in leaf litter or on the ground when they first find themselves in the great outdoors. Next thing you know, they’re having a blast working in teams to rake up giant piles of leaves (and jump into them), gather sticks and branches, and peel up dead bark in sheets. The trick is to take what would normally be a chore, and transform it into play. It can be a social activity where everyone collaborates, building up each other’s strengths and compensating for their weaknesses. Making a shelter really helps people get over any hang-ups and break down any barriers they see between themselves and the natural world, because before too long you’re covered with nature in the form of “dirt” and leaf duff, and, lo and behold, it’s fun. According to the hygeine hypothesis, getting all this crud on you is actually beneficial to your health and immune function, and missing out of the experience of slathering yourself in benign and beneficial symbionts (bacteria and other) can be detrimental.


 We were so excited to hear that one of our homeschool students loved our program so much that she wanted to host a fundraiser for the AK Send-a-Kid-to-Camp fund as her community service project.